WordPress was born in 2003 and is the most popular content publishing platform. It’s the backbone of the web. Here’s how to install WordPress and start your own site in 10 minutes without any tech know-how or prior experience.
Why is WordPress so popular?
More than 61% of all the websites that use a content management system use WordPress, which means that it runs more than 35% of all the sites online.
WordPress hosts my site and millions of other one-person sites. At the same time, WordPress also hosts websites of big corporations such as Facebook and CNN, and large institutions such as The White House and NASA.
Here’s a look at the popularity of WordPress compared to some of the other website builders and content publishing platforms you may have heard about:

What makes WordPress so popular? It is free and open-source, which makes it easy to get started with and flexible too. There is a massive community of fans and developers, which means that you never have to start from scratch.
There are tens of thousands of free design themes and plugins you can use to create a site with a beautiful design and any possible feature you can imagine. All this saves you tons of development time and money.
Pretty much anyone can start a website using WordPress within a few minutes. And all this without any prior experience needed, without any design or tech know-how.
It’s also simple to get and find help and answers to any question you might have. There are sites with guides such as my site and many other communities full of passionate and knowledgeable people that are willing to help newbies.
What’s the difference between WordPress.com and WordPress.org?
WordPress.org is the home of the open-source content management system. WordPress.com is the hosted and commercial version of the software.
When using WordPress.org, you download the software and install it on your own domain name and hosting server. You are responsible for maintenance, security, updates and everything else to do with it.
On WordPress.com, everything is taken care for you. WordPress.com team hosts your blog, updates the software, and makes sure everything is safe and secure. You can pretty much start writing straight away.
In general, WordPress.com has fewer features, design themes and options for you to play with. It is also a premium platform, so it comes with a higher price tag.
WordPress.org is free to use and you’re entirely in charge and control. There is a medium learning curve, so it’s best to take a bit of time to learn the basics of WordPress to have a better long-term experience.
I use and recommend WordPress.org as the best long-term solution for people who have higher aspirations and dreams for their sites.
How to install WordPress: A Step-By-Step Guide
WordPress admin dashboard welcome screen
WordPress admin dashboard is where all the magic happens. It may look a bit too advanced, confusing and complicated at first glance, but it is a powerful software that is easy to figure out.
There is a medium-sized learning curve to get used to it so do take some time to explore the opportunities and possibilities now open to you.
Here’s how the welcome page looks like:
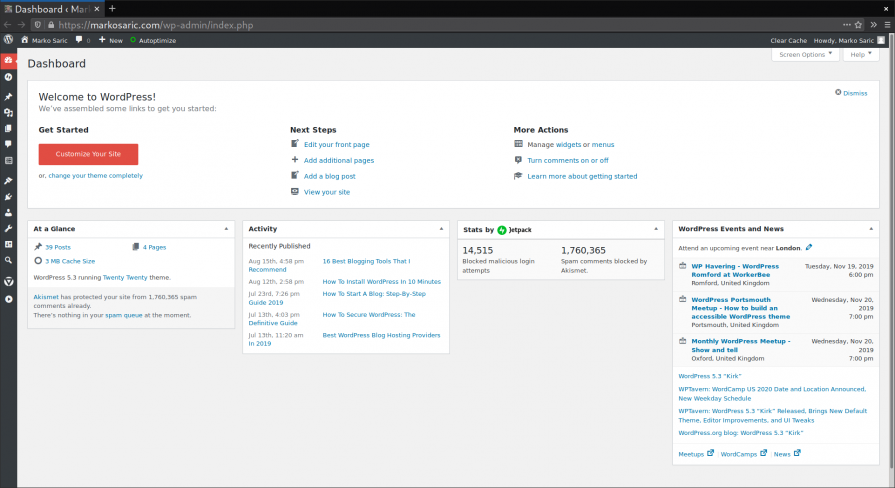
It’s a dynamic welcome screen so it will change depending on what plugins you install.
It’s possible to customize your welcome screen. You can drag and drop any of the elements to place them wherever you wish.
You can also click on the “Screen Options” in the top right. Here you can decide which of the widgets to hide or show on your welcome screen. Here’s how the welcome screen looks when all the elements are hidden:

WordPress admin dashboard navigation menu
On the left hand side, you see the WordPress navigation menu. I’ve collapsed it to make it more minimal but this is how it looks like in the full view.
The navigation menu is dynamic as well and it may change depending on the themes and plugins that you activate.
“Dashboard” like seen above features all the announcements such as the latest updates to the WordPress software and blogging statistics.
In “Posts”, you can write your first blog article. Posts are the main content of your blog. Posts traditionally feature a published on date in the byline and are placed in reverse chronological order on a traditional blog homepage.
In “Posts > Categories”, you can group your posts into topics and allow users to find your content easier. A category page lists all the posts from that category. These pages are very useful to give your visitors an access point to dig deeper into your content.
“Posts > Tags” are similar to categories but they are just used more specifically. While I might have a category called ”Celebrity style” I might put a celebrity’s name as a tag to a post. A tag page showcases all the posts that are tagged with that specific keyword.
In “Media” you can upload your multimedia and get a list of all the imagery and videos you have uploaded.
“Pages” are more strategic than posts and are not updated daily. They are traditionally placed in the navigation menu and contain more static information such as an “About page” or a contact form.
In “Comments” you see all the comments posted by your visitors. You can reply to the comments and moderate the conversation.
“Appearance” is all about the look and feel of your site.
In “Plugins” you can find and activate powerful plugins to extend the functionality of WordPress. There’s a plugin for anything.
In “Users” you can edit your user profile or add other people who will be your collaborators.
In “Tools” you can import content from other platforms that you used to host your blog on.
In “Settings” you can change the name of your blog, add the tagline and do other useful tweaks. This is one of the sections that will change a lot depending on which plugins you have activated as some of them will add extra options.
Pick a pretty WordPress design theme
In “Appearance > Themes” you can discover beautiful design themes that can make your blog look pretty. There are thousands of them.
There are more than 7,000 free WordPress design themes in the official WordPress directory at the time of writing. An important thing to note is that you can change your theme with one click at any time without affecting the content you have published. It’s easy:
This means that I recommend you pick the first pretty design you like or even just use the beautiful and modern default theme Twenty Twenty. There is not much use in spending days or hours exploring the different options so early.
The bigger value is in actually creating some content and attracting people to visit you.
Edit the settings of your chosen theme
In “Appearance > Customize” you can edit your chosen theme to make your blog look any way that you want in terms of fonts, colors and more.
It also allows you to preview how your changes look on desktop, tablet and mobile devices.
As you can understand by now, even this section is dynamic and changes depending on the theme and plugins you have installed.
“Site Identity” is where you can edit the site title, the site tagline, the logo and the favicon.
“Colors” is where you can change the colors including background, header, footer and fonts.
“Theme Options” includes option for the search in the navigation and the option to choose to display full post or summary.
“Cover Template” and “Background Image” include further settings for the look and feel of your content.
“Menus” is where you can choose the navigation menu.
“Widgets” allows you to add elements to the footer of your site.
“Homepage Settings” allows you to set a static page as your home page.
“Additional CSS” is where you can add CSS code to change the way your theme works.
Create a navigational menu for your site
In “Appearance > Menus” you can set up your navigation menu. Your navigational menu is normally placed in the header of your blog theme.
It usually consists of items such as the “Home” button, “Start Here” page, “About” page, “Contact” page and similar.

Your menu can include anything you really want. Any page or post that you have published or any other link in general.
Use the “Add menu items” section on the left hand side to start adding items to your menu and save the menu when you’re done.
Write and publish your very first article
So you now have a pretty looking WordPress site installed on your own domain name. It’s time to start writing and creating. Go into the “Posts” section and click “Add New” to start typing.
This is where you’ll spend the most of your time when inside the WordPress admin. Here’s how your default screen might look like.
The screen pretty much displays whatever the final product visitors will see, so it may look different depending on the theme that you chose.
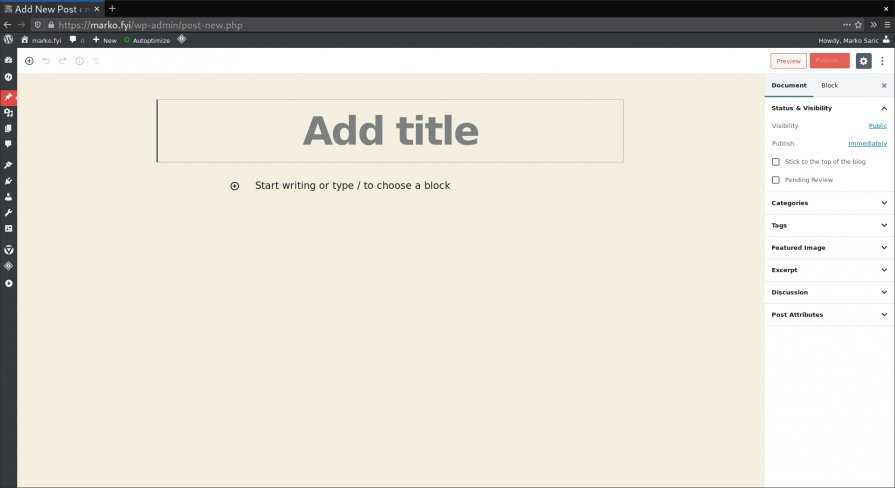
I prefer a more minimal and distraction-free look so I hide as much as I can:
- I close the “Settings” panel on the right hand side
- On the top right, I click on the “More tools and options” icon and then select “Top Toolbar“, “Spotlight Mode” and “Fullscreen Mode“
The result is this very distraction-free creative interface with the focus being on the paragraph I am currently editing:

WordPress editor is called “Gutenberg” and it really makes it simple to create beautiful looking and creative content. The editor is based on blocks. You add a block by clicking on the “Add Block” icon.

There are many blocks available by default in the Gutenberg editor. Plugins can also add additional blocks. This pretty much means that there’s a block for anything.
They allow you to be very creative and present your content in unique ways. There are blocks for tables, there are blocks for quotes, you can add any media using a block and you can also embed content from other sites.
You can merge blocks into “groups” to make them have a unified look distinct from the rest of your site. You can create “reusable blocks” to easily insert same content throughout your site and be able to edit it all from one single place.
It’s time for you to explore the content editor and be creative.
Share things that you love. Share what you know. Help people. Inspire people. Make people laugh. Answer their questions. Solve the issues they have. Make their day just a little bit better.
This is the way to start building your audience and becoming an authority in your chosen field.
Three WordPress plugins to activate
Like with themes, you now have access to thousands of free WordPress plugins to add pretty much any type of functionality to your site that you can imagine.
There are more than 55,000 free plugins in the official directory right now. These are the three you can start your exploration with:
- A plugin that’s recommended for everyone is one that helps you optimize your blog for search engines by adding the meta tags and by creating a sitemap. I use and recommend The SEO Framework.
- The second plugin I’d recommend is the one created by the WordPress team itself. It’s called Jetpack and it’s a jack of all trades. I suggest you explore it a bit and use it to at least set two-step authentication for your login. This will keep you safe and secure from brute force login attempts.
- Last but not least I recommend you activate Akismet. This is another plugin created by the WordPress team. It’s great at preventing spam comments and spam contact form submissions.
Publish an about page with a contact form
In “Pages > Add New“, I recommend you publish an about page and add a contact form to it so it’s easy for people to reach out.
Adding a contact form is as easy as this:

There you go. You now have a domain name, a hosting account and a brand-new WordPress site on it.
You’ve chosen your design theme, you’re created your navigation menu, you’ve installed a plugin or two, and you’ve published a page and a post.
Your new site is accessible by anyone in the world using your unique domain name. Enjoy!